
Digital photo frames offer some fun nostalgia, but I don’t particularly love illuminated displays all over the place. Recently, I saw a couple of writeups about building a photo frame with an e-paper panel (of Amazon Kindle fame, but popping up in lots of embedded devices).
- How to build a DIY e-paper photo frame from scratch by David Eisinger of Viget
- I crammed an e-ink screen into an IKEA picture frame by Reddit user
ThePhotoChemist
That’s a fascinating match — and a cool aesthetic. After letting the idea age in “too many browser tabs” purgatory, I finally took the plunge into side-project madness to make a couple for my family for the holidays. Here’s how I made it work.
Supplies
- Raspberry Pi Zero with Headers
- Waveshare’s 7.5" e-Paper with built-in HAT
- Cloudflare Pages, Workers, KV, and R2
- 16GB MicroSD Card, USB Micro cables, USB chargers
- Knives, tape, and superglue
- Custom cut mattes from Jerry’s Artarama and table frames from Michael’s (oh how I miss Aaron’s Brothers).
The Build
Part One: Software and Images
I wanted to keep one for myself and give a few away — but for them to all be in sync. So I decided to make this a cloud service. That also meant I could build the backend using familiar tools.
- Frontend web application for managing the “carousel,” hosted at paperframes.net
- Backend API for storing and serving the images
- And the client software running on the actual device.
  graph LR

  subgraph CW [Cloudflare Workers]
    W(Worker) --> R2(R2 Storage)
    W --> KV(Workers KV Datastore)
  end

  subgraph CP [Cloudflare Pages]
    R(Next.js SPA)
  end

  subgraph P [Paperframe Device]
    C(Client Software) --> W
  end

  R -.-> W

  style CW fill:#f9f9f9,stroke:#ccc
  style CP fill:#f9f9f9,stroke:#ccc
  style P fill:#f9f9f9,stroke:#ccc
- Device client:
paperframe-client - Backend Worker:
paperframe-api - Frontend webapp:
paperframe-admin
For the frontend, I built a small webapp with Next.js that shows the images in the system and a simple about page. It also lets me log in to change the current image, change the order, or upload something new.
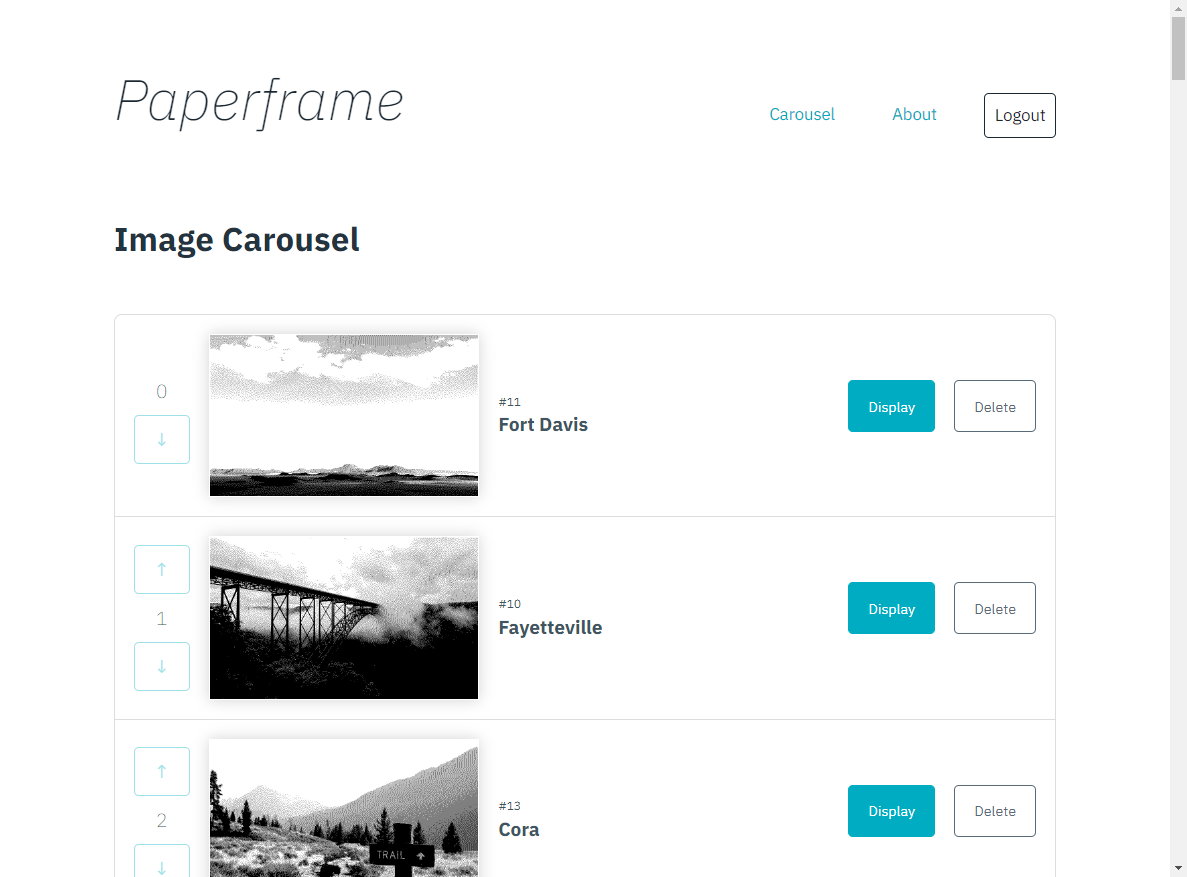
The backend API is a Worker script with a few simple API endpoints:
- Get the image currently on display
- Put a different image on display
- Upload a new image
- Delete an old image
- Get the list of all images and the order
- Change the order
The Worker also includes a scheduled task that updates what image is on display every hour.
And in another act of “stealing the office supplies*,” this whole ecosystem is hosted on Cloudflare’s Workers and Pages, with images stored and served from R2 storage; the “database” and metadata are JSON strings saved in WorkersKV.
The simple bindings config for KV namespaces and R2 buckets made it super easy to read (and write) data to/from these systems:
/**
 * For all routes, load up the carousel, current frame, the next ID to save, and
 * whether or not this request came with admin credentials. Save to conext.
 */
router.all('*', async (request, env: pfEnv, context: any) => {
  // Get our index of all images.
  context.carousel = await env.METADATA.get('carousel').then((data) =>
    data ? JSON.parse(data) : []
  );

  // Get the current index that should be on display right now.
  context.current = await env.METADATA.get('current').then((data) =>
    data ? parseInt(data) : 0
  );

  // [ etc... ]
});

// [...]

/**
 * GET an image download by ID. Returns the image file directly from R2.
 */
router.get('/api/image/:id', async (request, env: pfEnv, context: pfCtx) => {
  const image = context.carousel.find((i) => i.id.toString() === request.params?.id);
  const file = image ? await env.STORAGE.get(image.filename) : null;

  // Should be JPG or GIF only, although that is not currently enforced on upload.
  const ext = image?.filename.split('.').pop();

  if (file?.body) {
    return new Response(file.body, {
      headers: {
        'content-type': `image/${ext}`,
        ...globalheaders
      },
    });
  }
});
Authentication
This was a fun little puzzle because it could be simple. I used HTTP Basic
Authentication on the API endpoints (but not the interface). React can fetch
a test at /api/auth/check. The Worker will respond with a 204 success code
if the browser included the correct credentials — or a 400 otherwise — to
set the state of the frontend accordingly.
That way, the login and logout buttons can simply be links to the Worker’s
login/logout endpoints, which will issue (or not) a WWW-Authenticate basic
challenge header and redirect back to the application frontend.
And by protecting only the management endpoints, but not the interface, anyone can see what’s in the queue and what’s currently on display.
Image Prep
The display I picked does not do greyscale, nor is it particularly high resolution. But with heavy-handed edits, I really like the resulting aesthetic.

Images must be exactly 800x480 as a black or white bitmap.
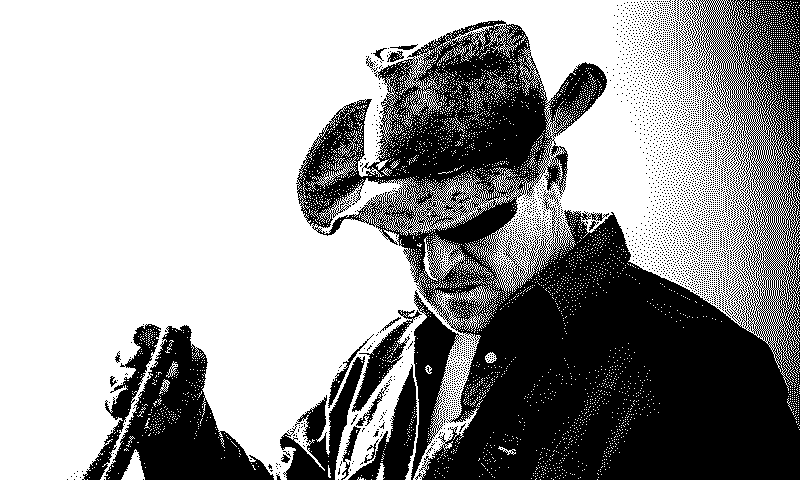
These restrictions also help unify the look of these very different photos.

I think it’s a cool effect.

So while I waited on the mail, I played in Photoshop.
![Me at Reimer's Ranch [Travis] County Park](sample-images/reimers.gif)
Part Two: Hardware
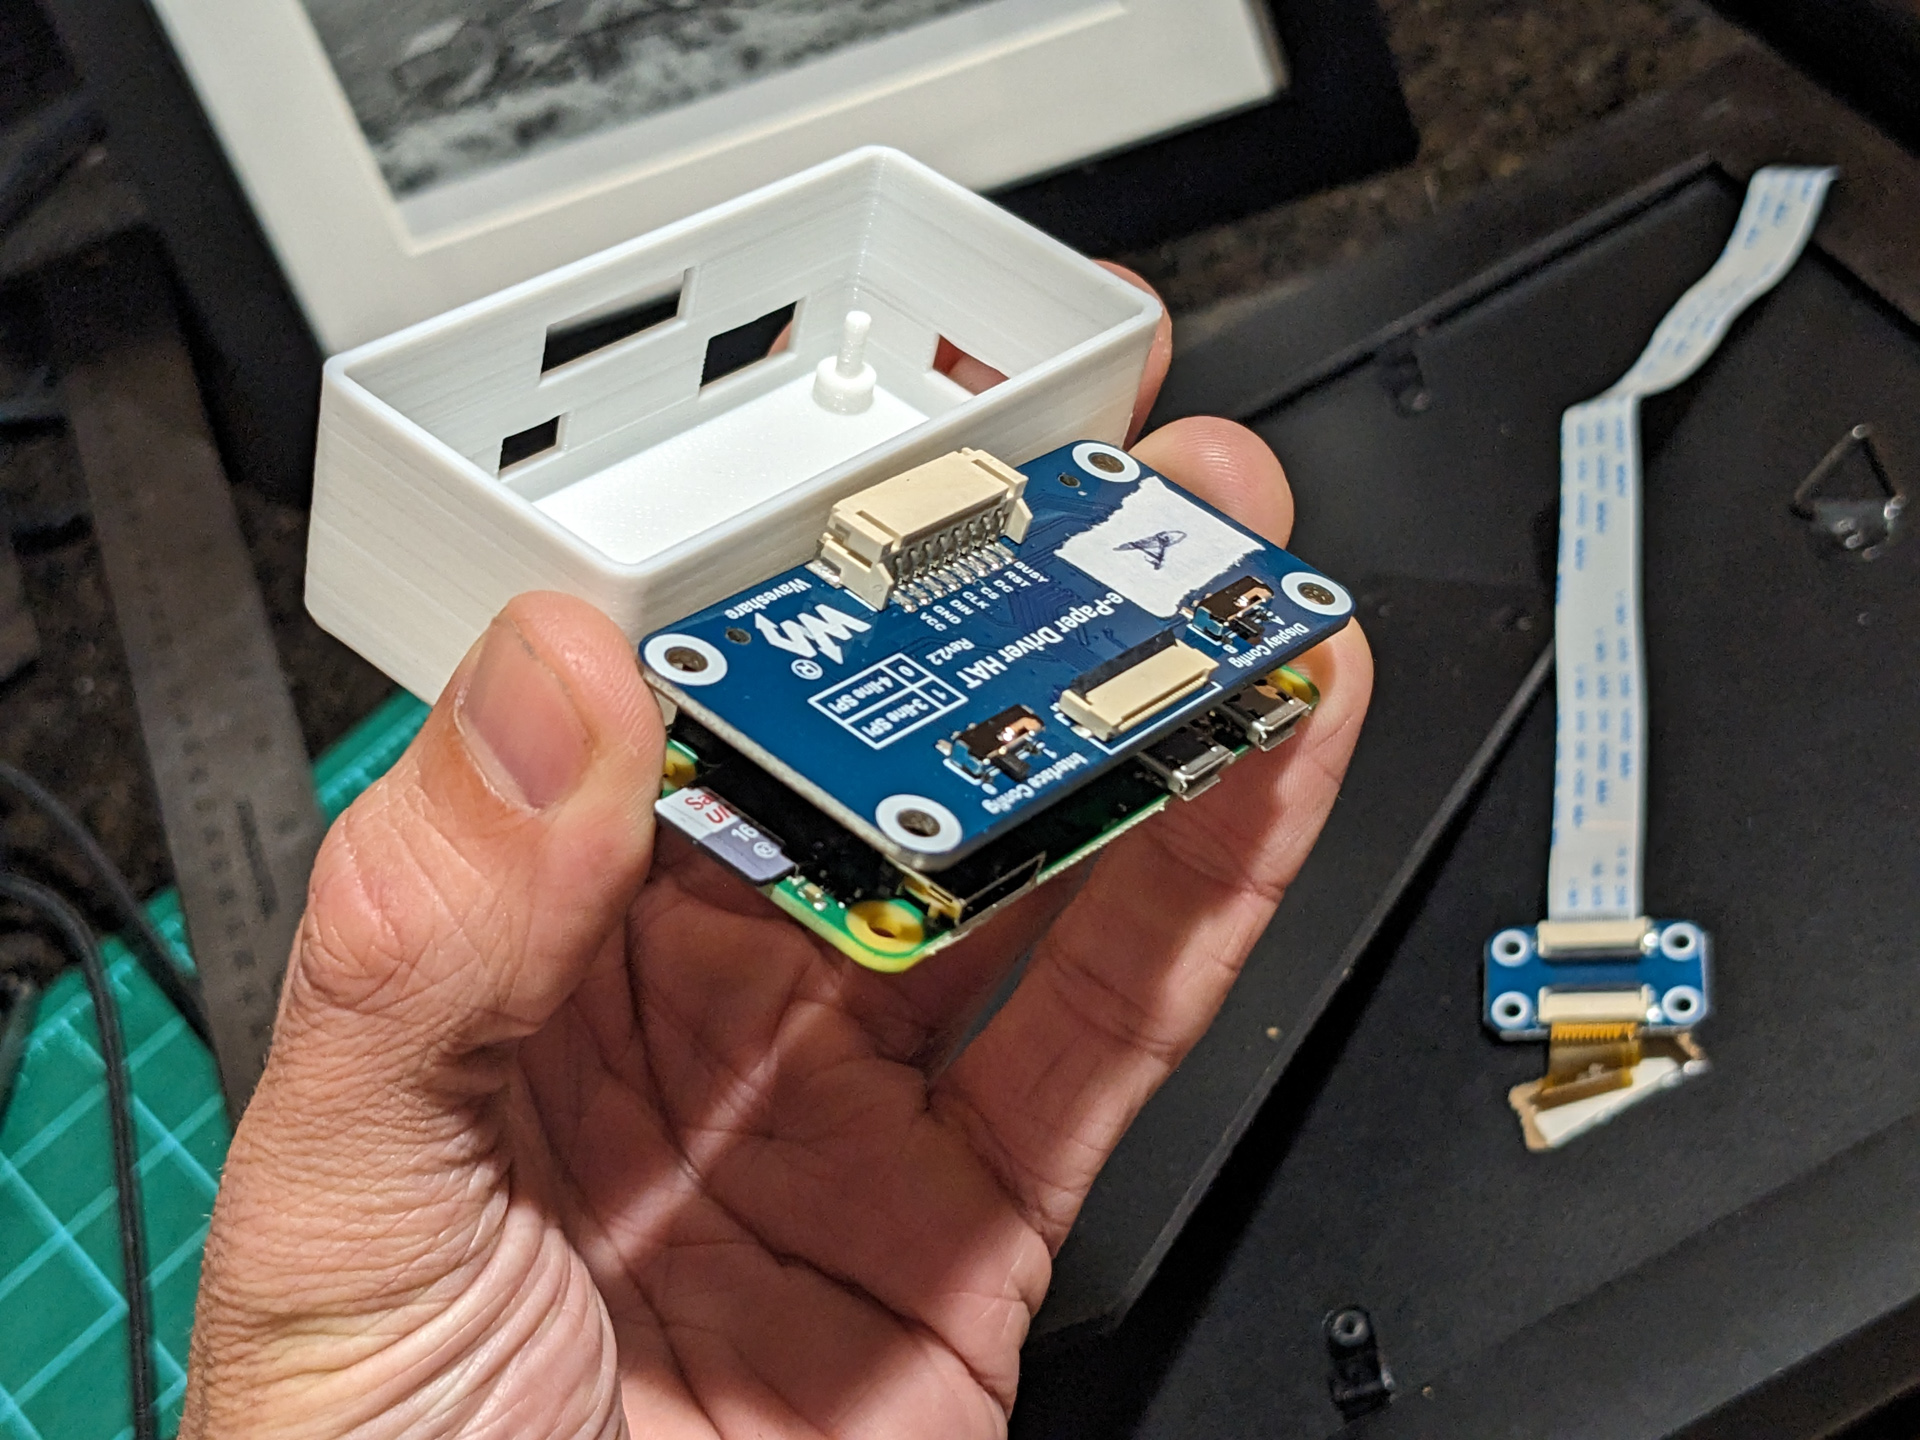
Once I received the Pi Zero and the display panel, I put the pieces together and carefully taped the whole mess to a clipboard for testing, having seen many warnings that these displays are incredibly fragile.
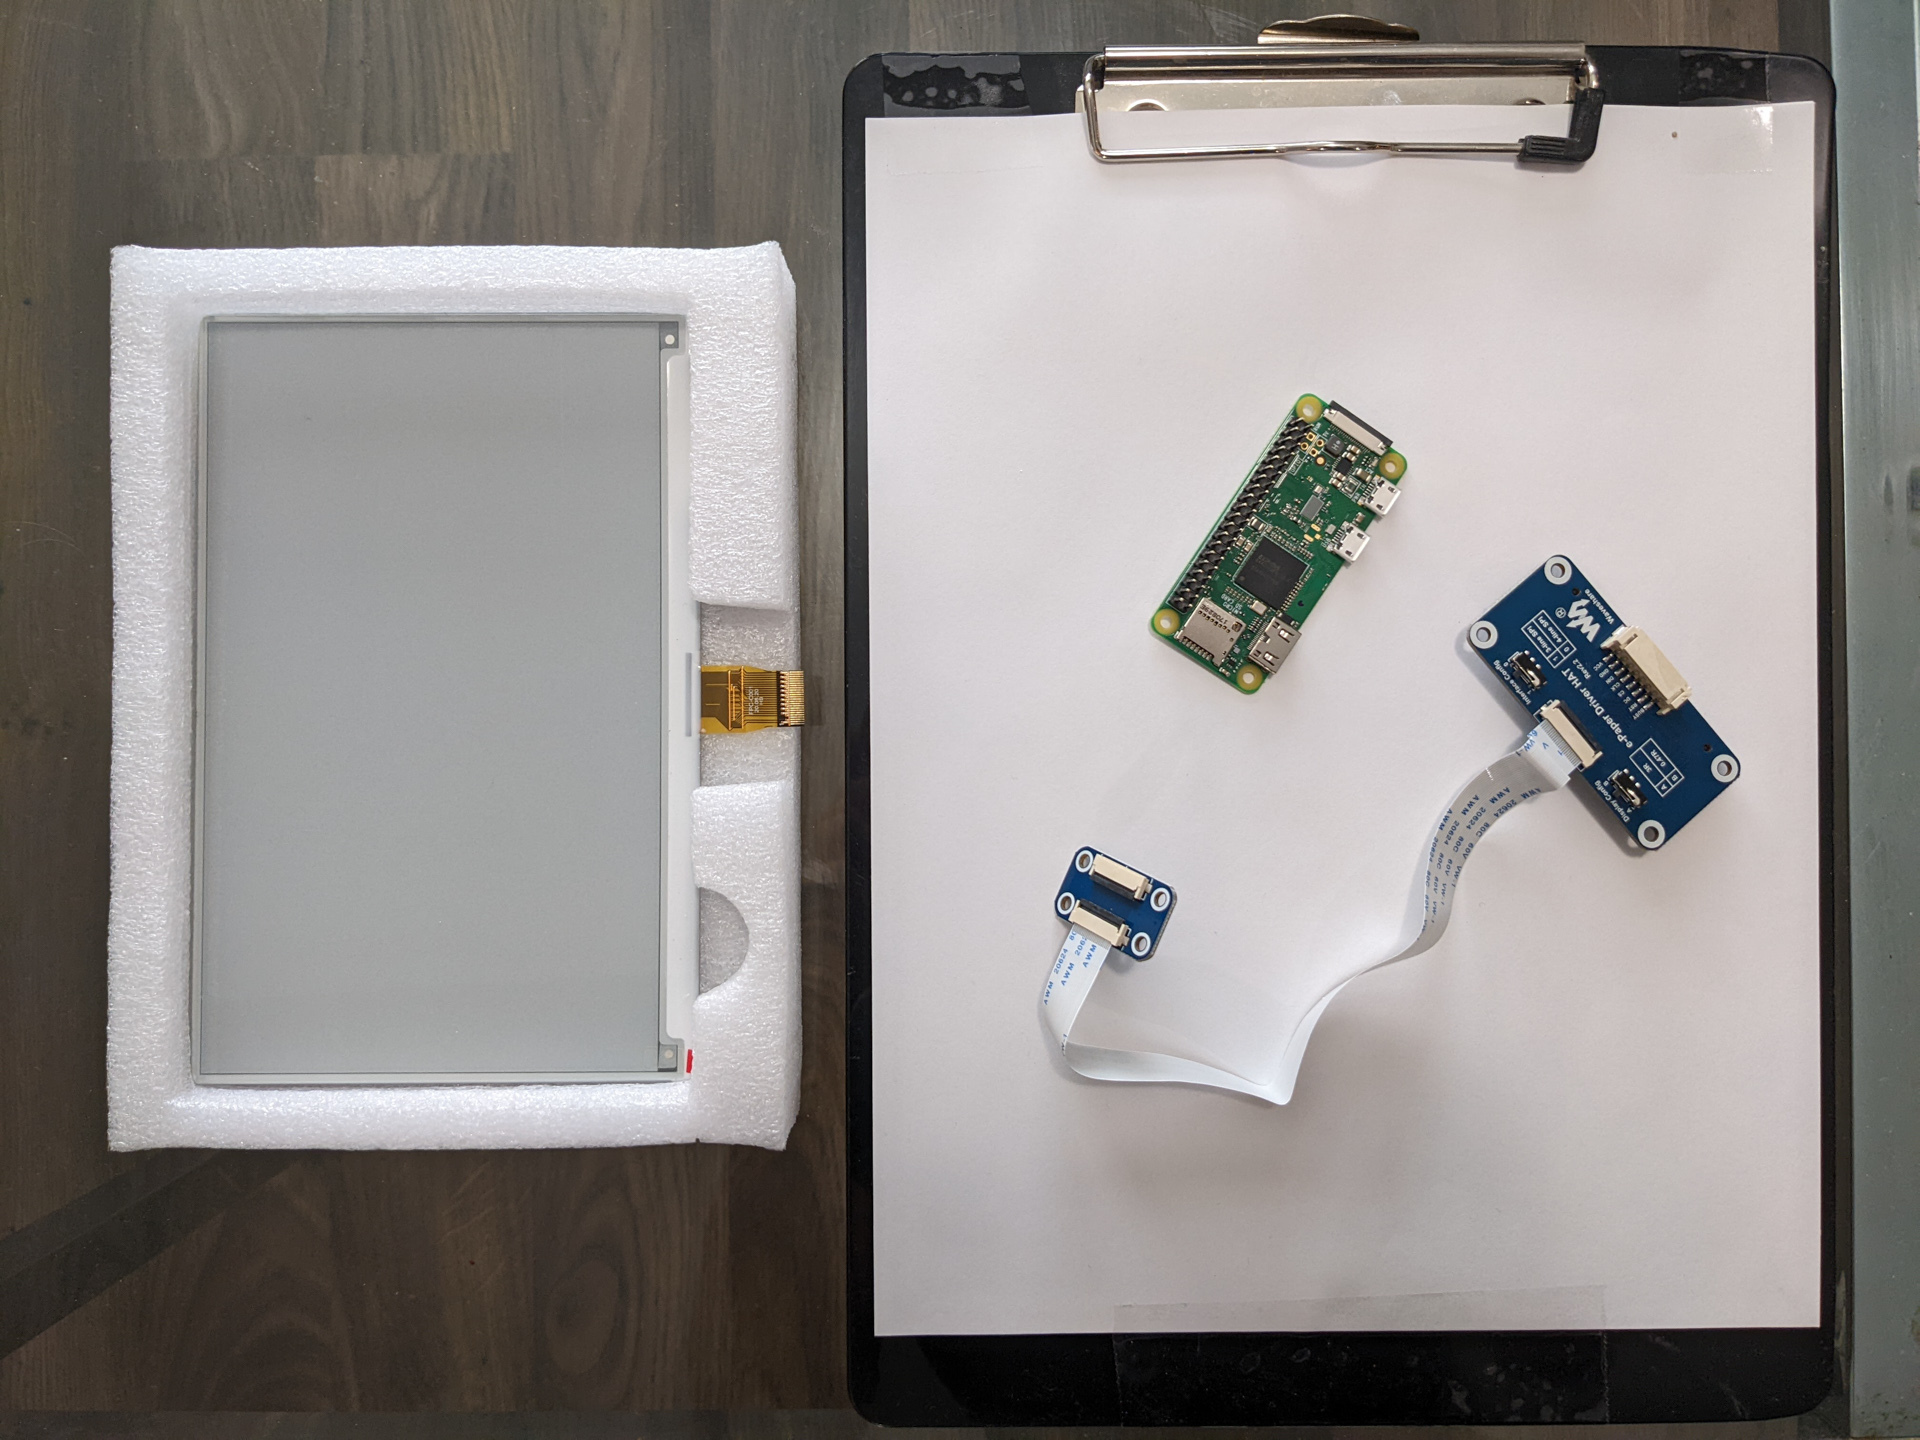
The Raspberry Pi Imager has grown up a lot and allows prepopulating wifi, login info, hostnames, and a handful of other details when it writes the operating system to the SD card. I never had to plug these into a TV or hook up a keyboard.
I also saw a StackOverflow post on how to save multiple wifi networks, so I added my apartment, each recipient’s home wifi, and my phone’s hotspot info (just in case).
Paperframe in Go
Like one of my reference tutorials, I opted to write the on-device software in Go for a few reasons:
- Ship a single binary to the device
- No runtime package dependencies
- Fairly simple syntax with a focus on early-and-often error handling
- At work, a lot of my team’s backend services are written in Go, so learning a little may be useful
- Selfishly, I also hoped to reuse a lot of the code from that tutorial, at least for the hardware interface.
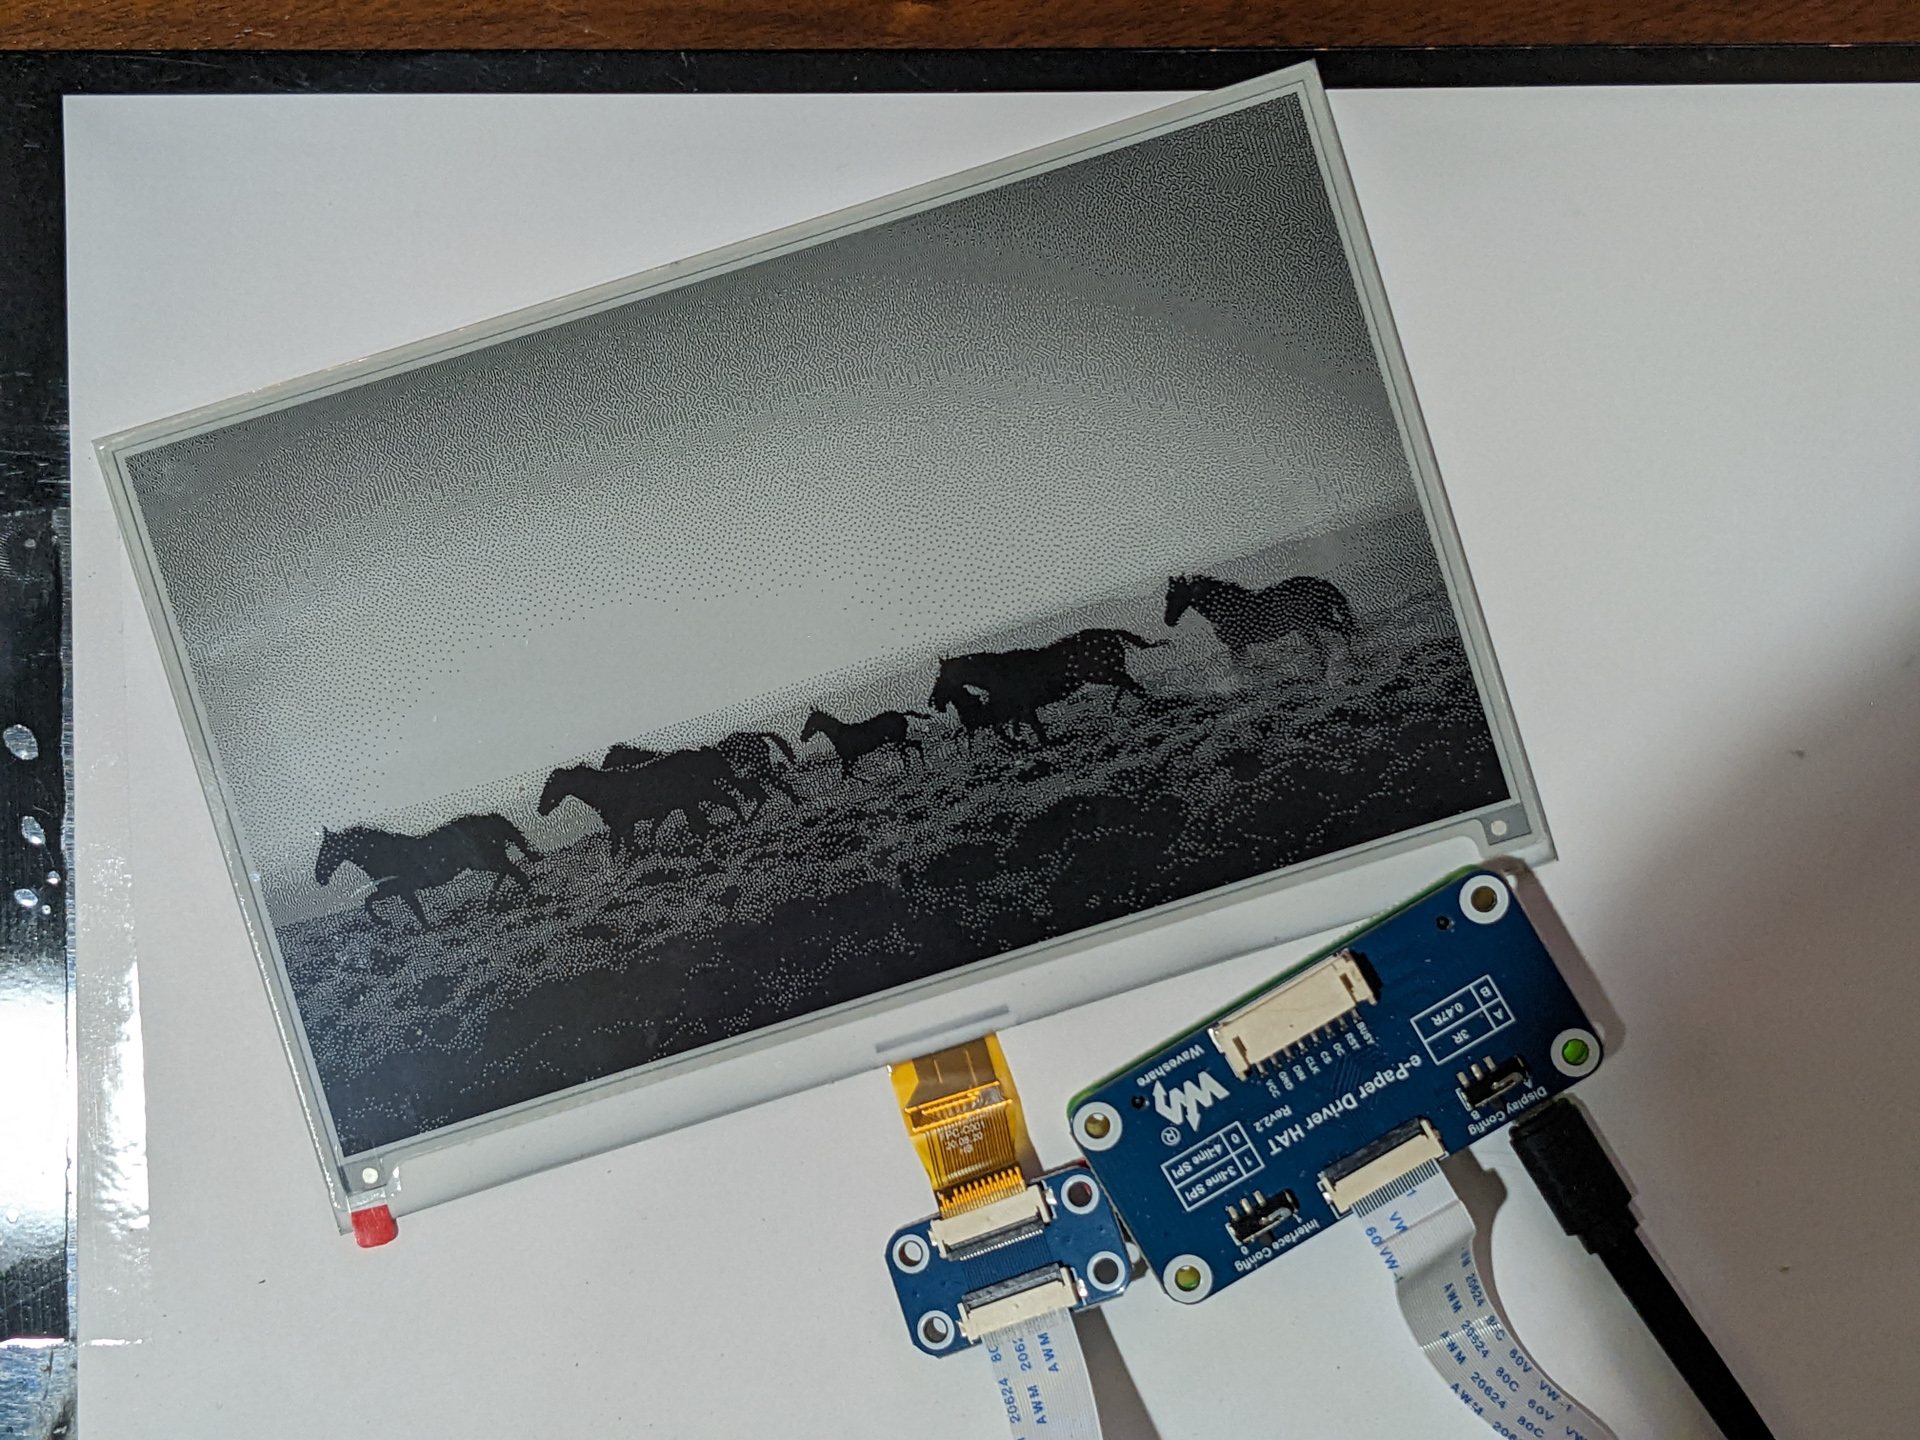
Turns out, his display and mine differ in enough ways that I spent the better part of a day just getting an image onto the panel. My screen kept getting stuck in an endless loop of static.
Ultimately, most of that boiled down to sending payloads of the wrong size; command mappings that had changed; or inconsistencies between the formal documentation, reference code from the manufacturer, and open-source code from other folks.
// Convert the input image into bitmap as a ready-to-display B&W bytearray.
// @TODO: Per the docs, 0=black, 1=white, but this works: 0 is white. 😕
func (e *Epd) Convert(img image.Image) []byte {
  var byteToSend byte = 0x00
  var bgColor = 1

  buffer := bytes.Repeat([]byte{0x00}, e.widthByte*e.heightByte)

  // Iterate through individual device pixel coords by col within row:
  for j := 0; j < EPD_HEIGHT; j++ {
    for i := 0; i < EPD_WIDTH; i++ {
      bit := bgColor

      // Check that the device pixel we're on is within the image canvas
      if i < img.Bounds().Dx() && j < img.Bounds().Dy() {
        // I flipped this from the original Go pallete. This uses [white=0, black=1]
        // because images were inverted. Something is getting inverted somewhere...
        bit = color.Palette([]color.Color{color.White, color.Black}).Index(img.At(i, j))
      }

      // These two statements do a bitwise shift and OR to pack 8 pixels (as
      // individual bits) into a single byte to send to the display.
      if bit == 1 {
        byteToSend |= 0x80 >> (uint32(i) % 8)
        // Compound operator: `x |= y` is the same as `x = x | y`
        // and the >> is a bitwise right shift
      }

      // If we're on the last pixel in a byte, save the byte and move on
      if i%8 == 7 {
        buffer[(i/8)+(j*e.widthByte)] = byteToSend
        byteToSend = 0x00
      }
    }
  }

  return buffer
}

// ...

// Paint a prepared bitmap in a bytearray to the screen.
func (e *Epd) Display(img []byte) {
  e.sendCommand(IMAGE_PROCESS)
  e.sendData2(img)
  e.sendCommand(DATA_STOP)
  e.sendCommand(DISPLAY_REFRESH)
  time.Sleep(5 * time.Second)
  e.waitUntilIdle()
}
David’s bitwise math to convert a bitmap image to bits and pack them into bytes was a tricky piece of work to debug while also trying to reverse engineer some of the undocumented changes to the screen’s command mappings.
I will say, Go’s pattern of writing if err != nil checks after just about
every line of code is tedious. Also, the double-negative and the two-value
return pattern did trip me up a few times.
// Fetch an image to display.
func getImage(id string) (image.Image, error) {
  path := "/image/" + id
  data, err := http.Get(API_ENDPOINT + path)

  if err != nil {
    if DEBUG {
      log.Printf("Unable to fetch image at '%s': %#v", path, err)
    }
    return nil, errors.New("Unable to fetch image. (Networking error)")
  }

  if data.StatusCode != 200 {
    if DEBUG {
      log.Printf("Couldn't fetch image at '%s'. HTTP %d.", path, data.StatusCode)
    }
    return nil, errors.New(fmt.Sprintf("Unable to fetch image. (HTTP %d)", data.StatusCode))
  }

  image, err := decodeImage(data.Body, data.Header.Get("Content-Type"))
  if err != nil {
    return nil, err
  } else {
    return image, nil
  }
  // 👀 LIKE THIS ^^ "If ERROR is NOT undefined --> OTHERWISE --> this is the good place.
  // That doesn't feel very logically laid out, but I may be missing a best practice.
}
But it also made me appreciate the value of error handling early and often. I won’t have physical access to these devices after I give them away. (Well, I can always suggest the folks invite me over for dinner and troubleshooting, but I’ll feel bad if their present crashes.)
Finally, I added a simple Systemd service unit to start and manage the client program. Systemd can restart the program if it fails, blank the screen on system shutdown, and trigger the display to refresh when the system or networking restart.
Part Three: Enclosure and Frame
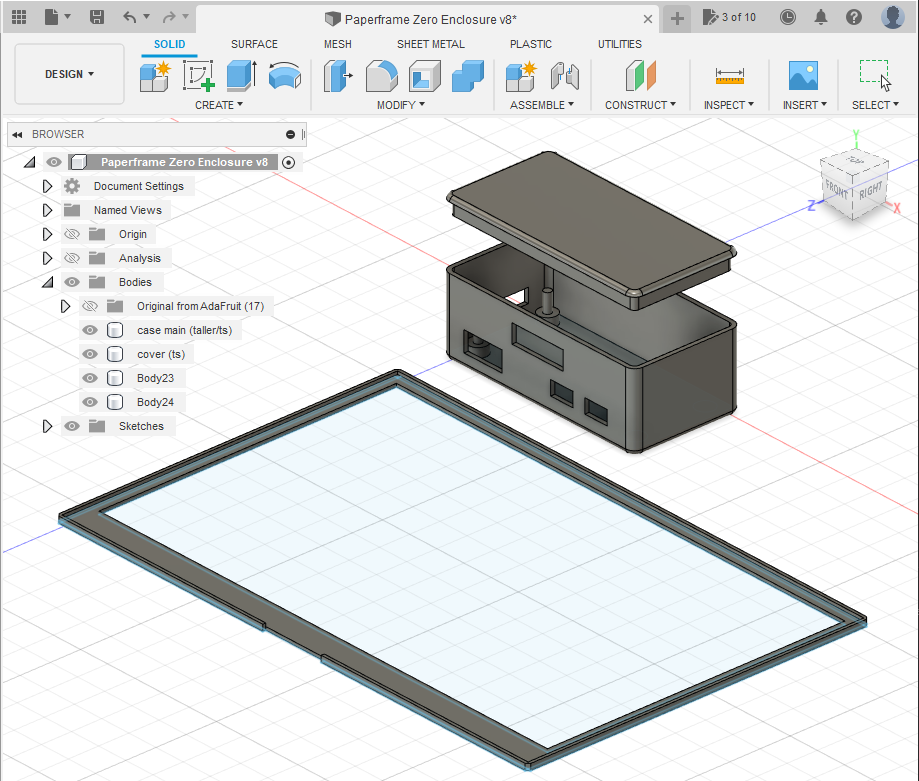
I modified the 3D models for Adafruit’s Raspberry Pi Zero Case to make additional room for the e-paper HAT board and its ribbon cable, then printed that at home:
There were once grand plans to take up carpentry on this project as well, and potentially swing that into a reason to join a local makerspace, but holiday crunch-time directed me toward the framing counter at a local art store instead.
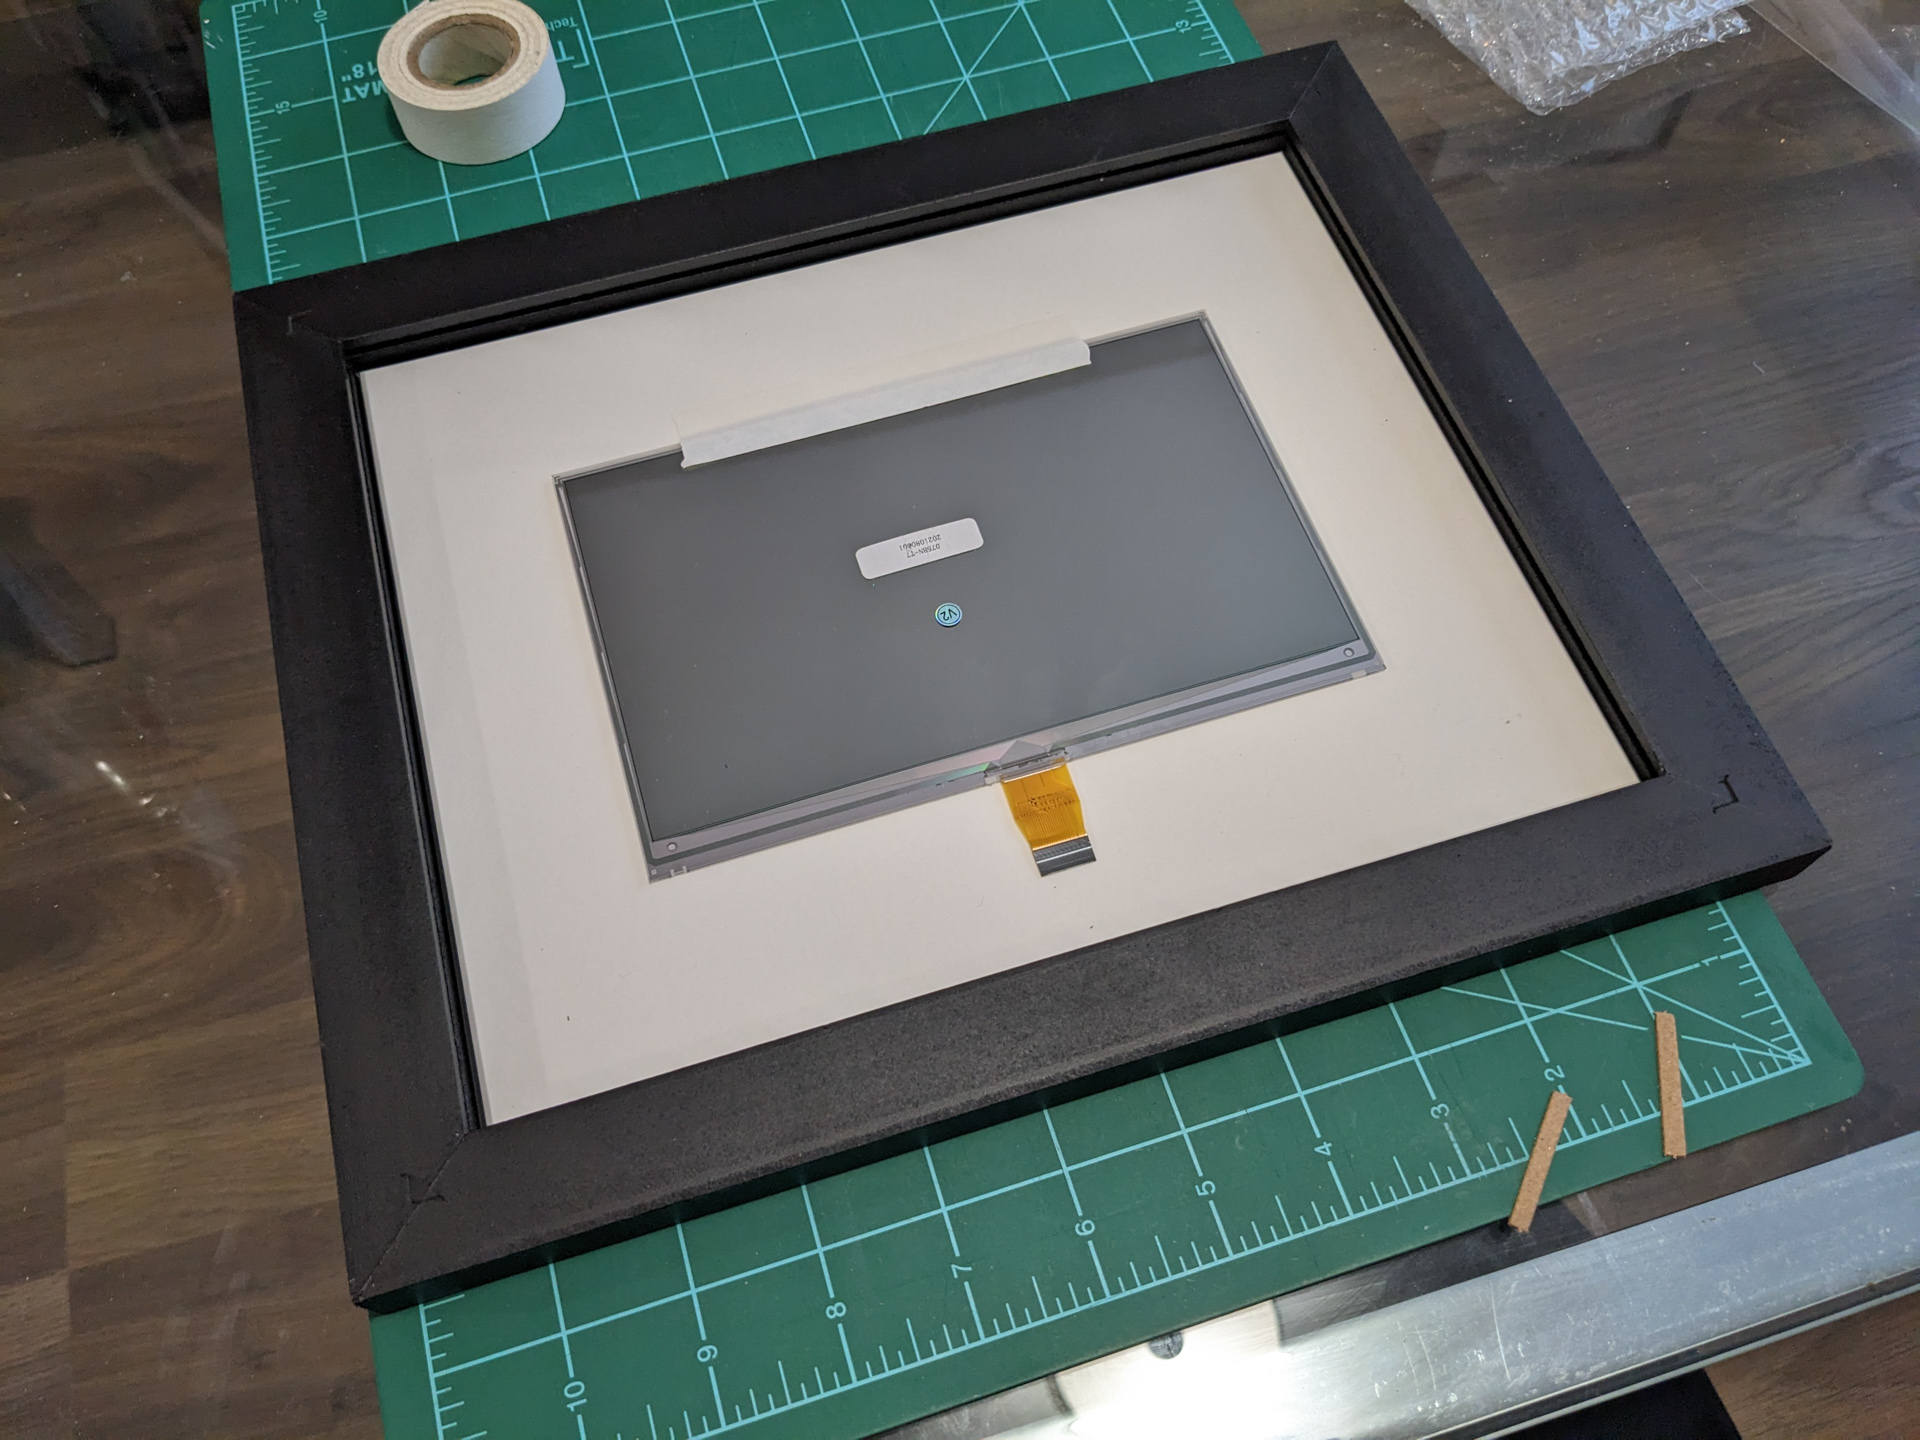
And in truth, that will look a little more at home on Smith family shelves.
I may 3D print a mount for the unit I’ll keep for myself that shows the electronics. “Circuit-board-chic” isn’t too much of a stretch for my messy desk.
(Un-)Boxing Day
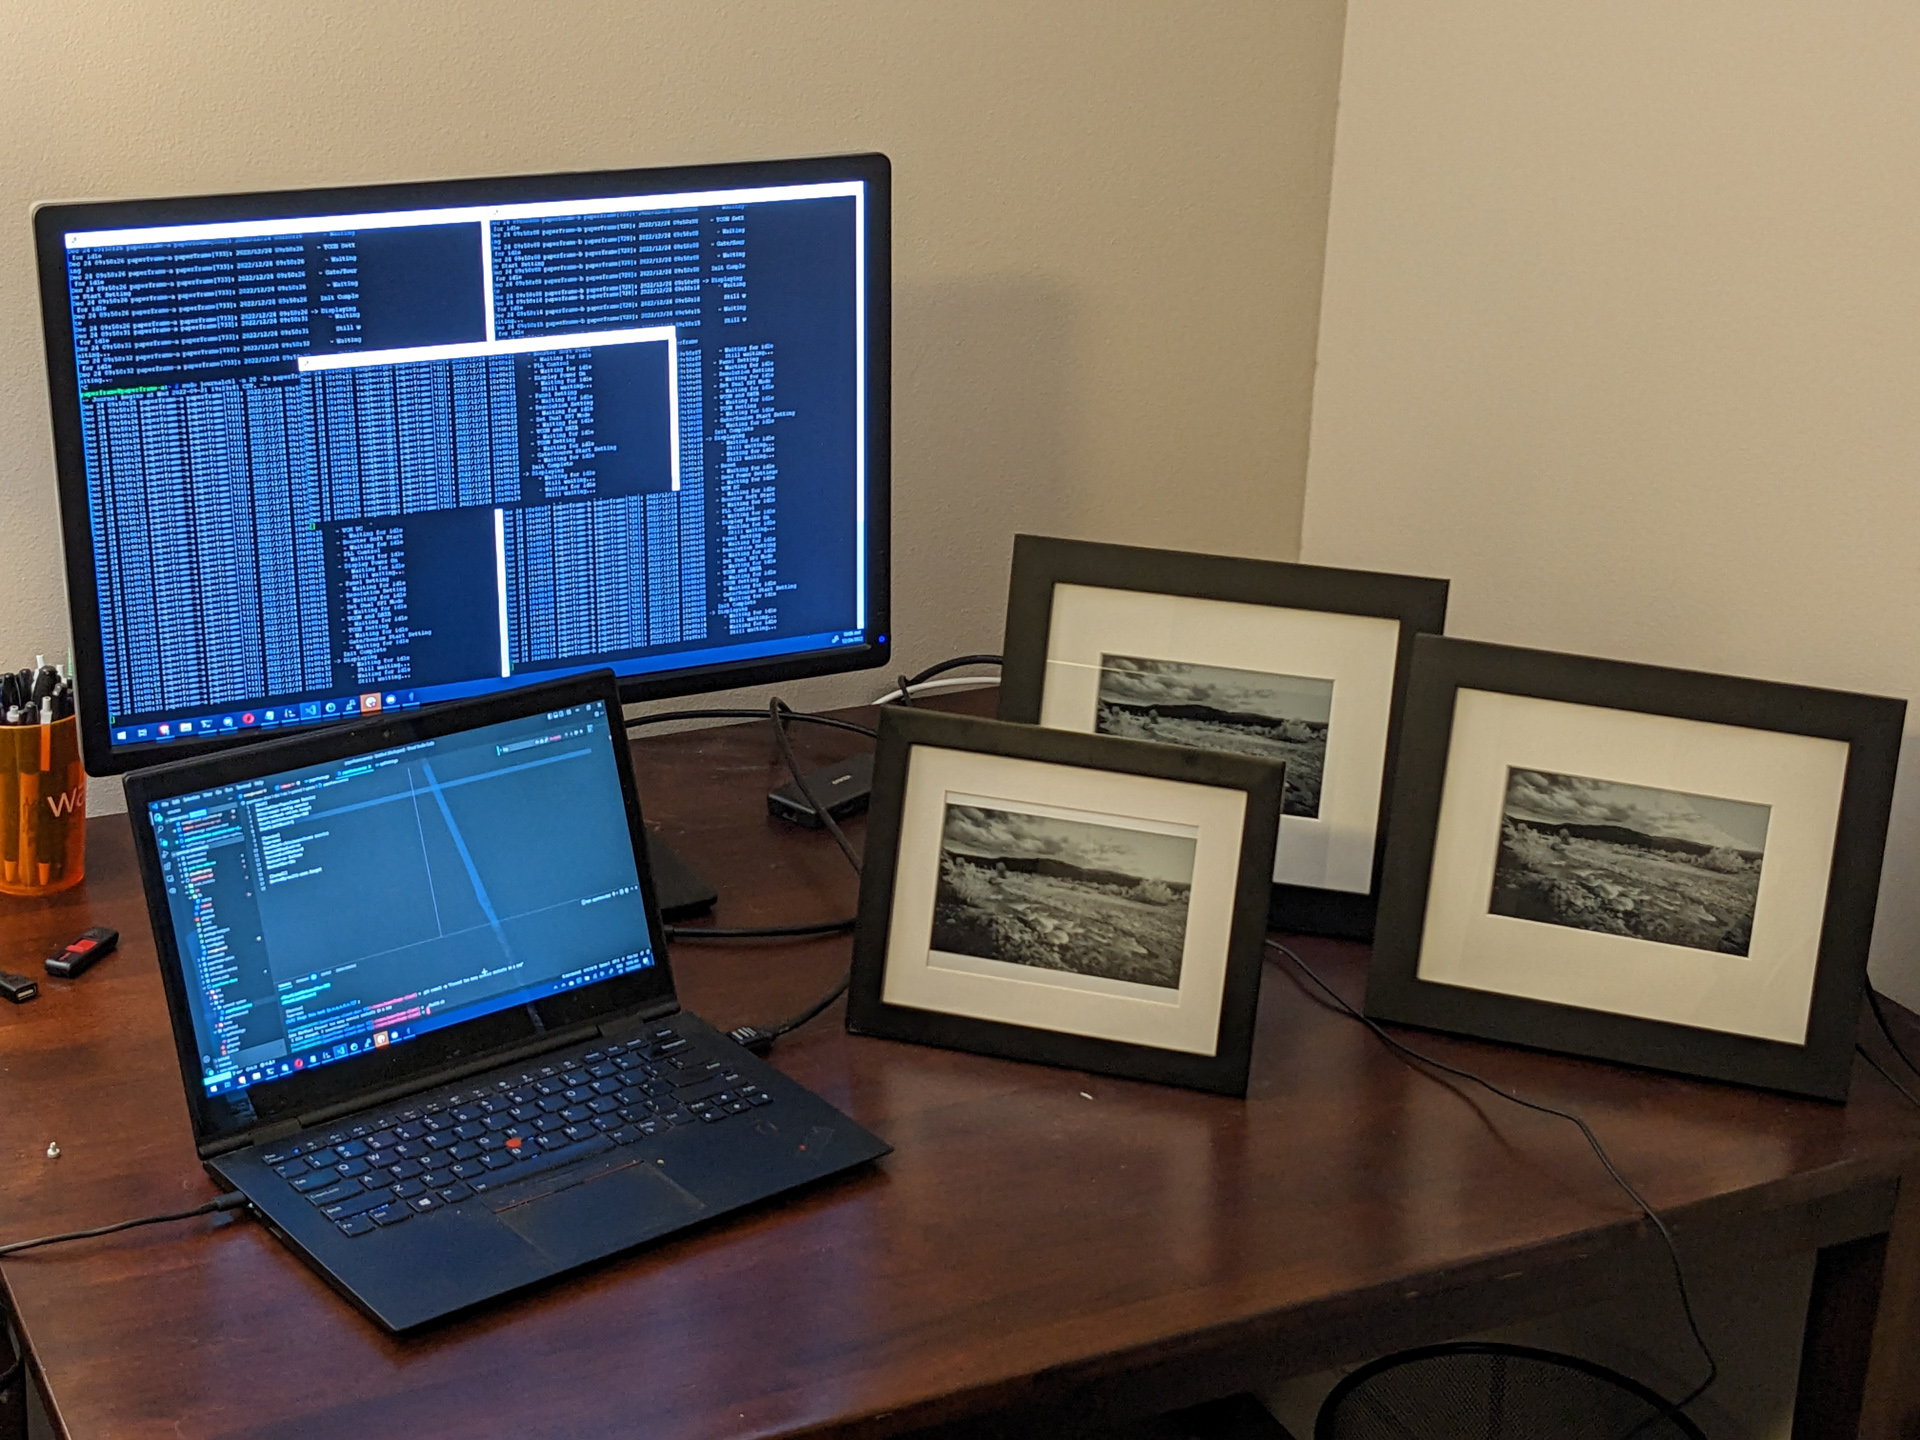
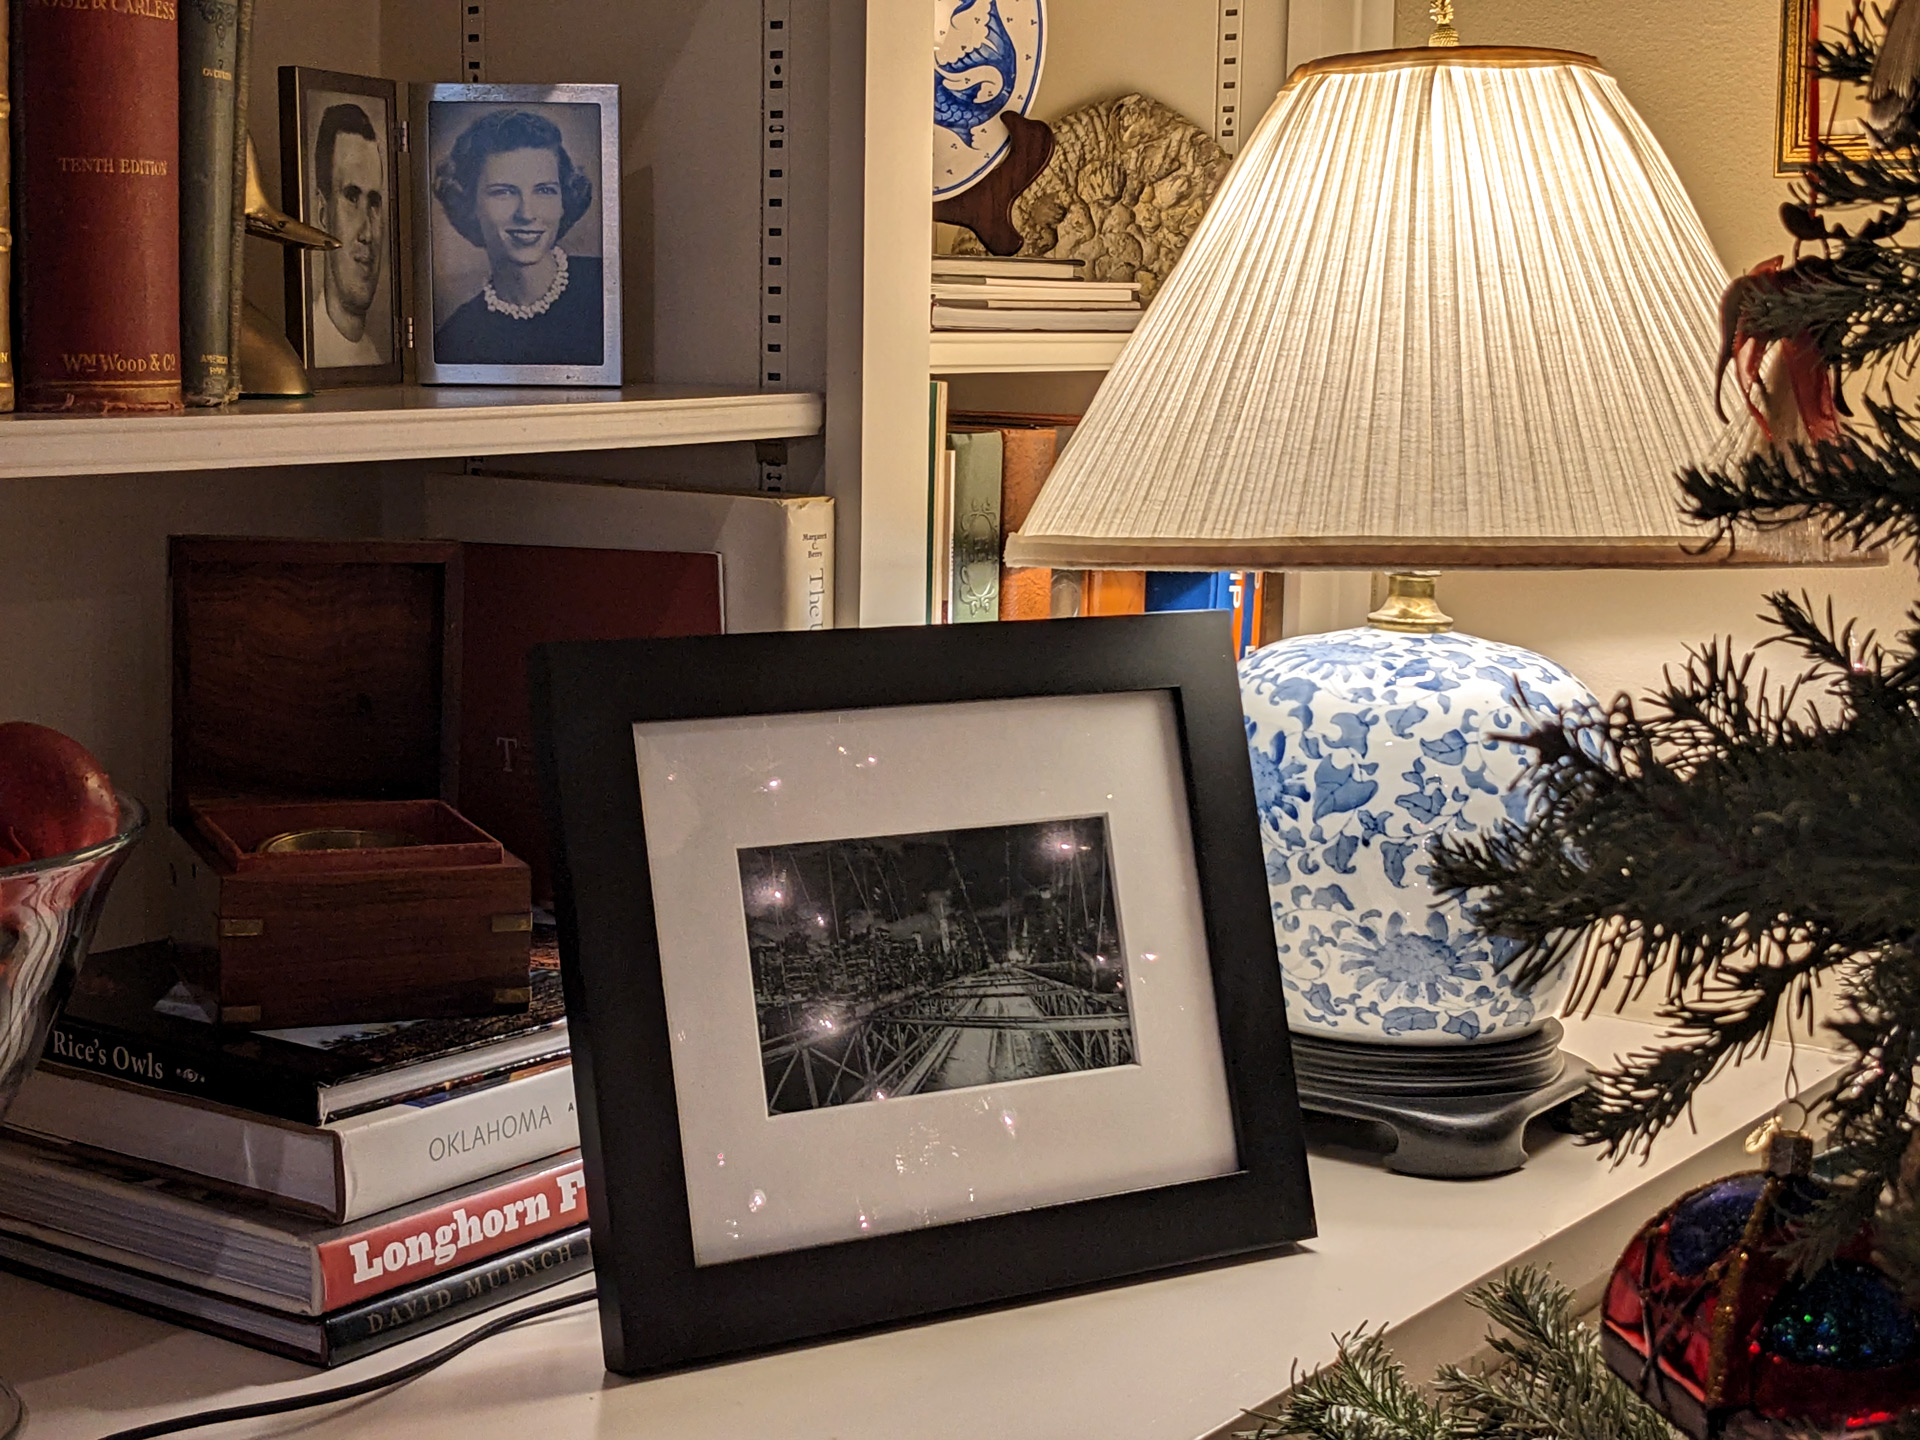
After breaking out the gift wrap, it was time to “deploy to production” around the Christmas Tree.
When my family unwrapped their gifts, Mom quickly plugged hers in.
And it didn’t work. 😭
Figuring the most likely culprit would be wifi signal, I turned on my phone’s hotspot. The Pi quickly connected to it and popped an image onto the screen to delighted (if mildly prodded) oos-and-ahhs from the assembled masses.
So before dinner, I broke out my laptop and fixed the incorrect wifi credentials. Paperframe has been running on the shelf since. Who doesn’t love a holiday hotfix…
Ultimately, I am really pleased with how these turned out. It was my first real foray into building something for hardware, although my last job involved a lot of manufacturing planning so I knew some of the gotchas to watch out for. I’d like to make a few more of these now that I have a decent blueprint for it.
And between a 3D-printed manatee cookie cutter, a Buzz Lightyear costume, the Paperframe, a campaign mapping site, another whack at Advent of Code, printed swag for a few events, and a hand-bound book, I think I can sign off from 2022 as a year of great side project adventures. Here’s to more in the new year. And maybe I’ll even join that makerspace anyway.
Happy holidays, merry Christmas, and a happy new year to you and yours.
TSmith
* Disclaimer: I am a Cloudflare employee, so some of our products are made available to me for free — although this project falls within the bounds of the Free Plan for its use of Pages, Workers, KV, and R2 completely. This is not product documentation or security guidance.